Blackmagic Camアプリを使えば、iPhoneでプロ並みのビデオ撮影ができ、P10/P10 Plusなどの外部ストレージデバイスに保存することで、携帯電話の内部ストレージを空けて効率的なタスクパフォーマンスを維持できます。
高品質な動画撮影は、かさばるDSLRやシネマカメラでしかできないと思っていませんか?もしそうなら、考えを改める必要があります。なぜなら、今はデジタル時代であり、適切なツールと組み合わせることで、あなたのiPhoneが最高のカメラとして機能するからです。
YouTube動画やVlog制作から旅行コンテンツまで、あなたのiPhoneは仕事を果たす上で最大の相棒となります。iPhoneは多くのタスクを実行できますが、最大の課題は、質の高い結果を得るためにiPhoneをどのように使用し、生成される大きな動画ファイルを管理するかを理解することです。
Aiffroは、Blackmagic Camアプリを使ってiPhoneでプロフェッショナルな動画を撮影する方法を紹介します。大きなファイルの保存は困難であり、Aiffro P10およびP10 Plus SSDがストレージ不足という共通の問題をどのように解決するかについて説明します。
iPhoneがプロの動画撮影に優れている理由
現代のiPhoneは、強力なカメラセンサーを搭載しており、プロ用カメラの小型代替品です。DSLRと同様に、4Kでの録画や複数のフレームレートに対応し、高品質な結果を提供します。iPhoneでシネマティックモードで録画中にスローモーション撮影が可能な機能は、さらに驚くべきものです。iPhoneは、
ビデオグラファーが高品質でプロフェッショナルな動画を撮影するために必要なすべてを備えています。かさばるカメラを持ち運ぶ必要がなくなり、ユーザーはいつでもポケットからiPhoneを取り出し、手間なくプロフェッショナルな映像を撮影できます。これらのデジタル資産を高品質で作業し保存するために、適切なアプリとストレージソリューションがあれば、iPhoneをプロレベルのビデオカメラのように使用できます。
このようなプロレベルのビデオ録画に適したアプリケーションは何でしょうか?
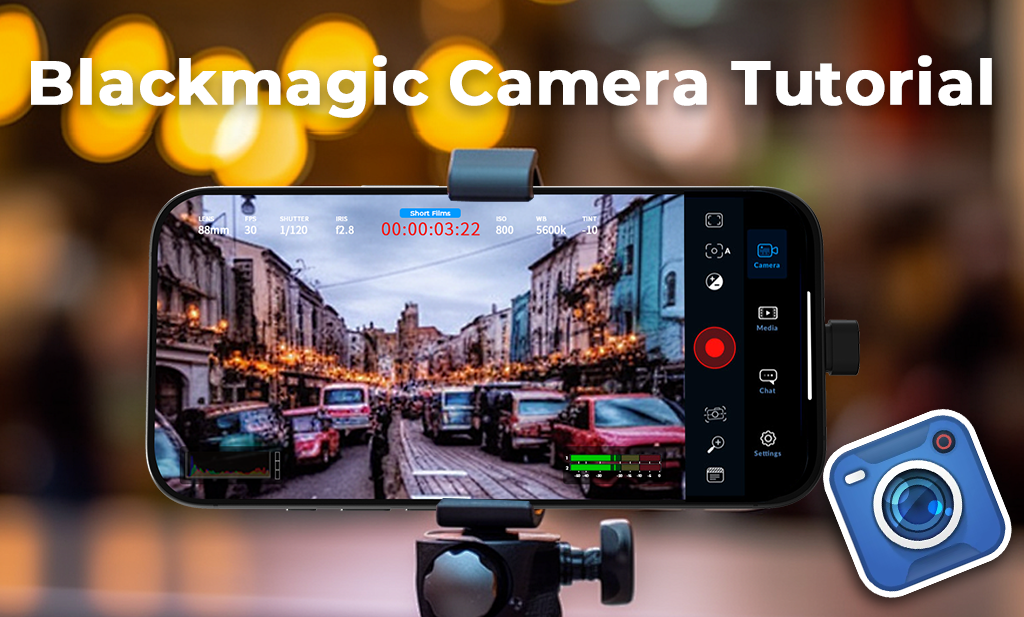
Blackmagic Camアプリは、プロレベルのビデオ録画結果を得るためにプロが必要とするあらゆる種類の設定を備えています。
Blackmagic Camアプリ
Blackmagic Camアプリは、プロフェッショナルなビデオカメラを製造するBlackmagic Designが提供する無料のカメラアプリです。このアプリは、DSLRスタイルのマニュアルコントロールをiPhoneにもたらし、ユーザーに映像に対する完全な制御を提供します。その注目すべき機能の一部を以下に示します。
- ISO、ホワイトバランス、フォーカス、シャッタースピードを完全に手動で制御可能
- 10-bit Apple ProRes記録をサポート
- リアルタイムヒストグラムとオーディオレベル
- Blackmagicのシネマカメラに似たクリーンなユーザーインターフェース
- Blackmagic Cloudへの直接アップロード
これらの機能すべてにより、iPhoneがより小型のシネマカメラのように機能します。プロフェッショナルグレードの結果を得るために、ProResのような高品質な形式で記録する際に発生するストレージの問題を忘れてはなりません。
iPhoneのストレージがすぐにいっぱいになる問題
ユーザーはプロフェッショナルな結果を求めて4KやProResで記録することがほとんどですが、結果として得られるファイルサイズは常に大きく、多くのスペースを占有します。数分の動画でもギガバイト単位の容量を消費するため、ユーザーがマルチタスクを行うとiPhoneの空き容量はすぐに不足する可能性があります。
iPhoneのストレージ容量は256GBまたは512GBがほとんどですが、ユーザーはさまざまなタスクのために重要なアプリケーションをダウンロードしてインストールすることが多く、それらもスマートフォンの動作を遅くするほど重いため、大きなファイルを保存するには十分ではありません。
ユーザーはファイルをラップトップやクラウドに転送して携帯電話の空き容量を確保できますが、これは旅行中や適切なデバイスにアクセスできない場合には手間がかかります。そのような場合、AiffroのP10/P10 Plusのような高速で信頼性の高い外付けSSDを使用することでストレージの問題を解決できます。
Aiffro P10とP10 Plus:クリエイター向けの高速ポータブルストレージ
Aiffro P/P10 Plusは、iPhoneやその他のモバイルデバイスで撮影するクリエイター向けに設計された、超高速でコンパクトなSSDです。
Aiffro P10 MagSafeポータブルSSD
- 最大2TBのストレージ容量
- 最大2000MB/秒の速度で高速ファイル転送
- MagSafe対応の磁気背面でiPhoneにしっかり固定
- iPhone向けにはType-C-Lightningアダプター経由で動作
- 小型・軽量で持ち運びやすい
長時間のインタビューや旅行Vlog用のBロールを記録するユーザーにとって、このSSDは撮影中に携帯電話の空き容量がなくなる心配がないという安心感を与えます。
Aiffro P10 Plus Lightning SSD
- LightningとType-Cのデュアルポート設計
- iPhone、iPad、さらにはカメラにもプラグアンドプレイで接続可能
- 追加ソフトウェア不要でファイルに直接アクセス可能
- マグネットアタッチメントにより、手持ち撮影中でも安定
- iPhoneの美しさにマッチする洗練されたデザイン
どちらのドライブもプロ向けに作られていますが、初心者でも簡単に使えます。高速性能のおかげで、大量のファイルを数秒でラップトップやデスクトップに転送できます。SSDに保存したい場合は、iPhoneでBlackmagic Camアプリを使って動画を撮影し、外部ストレージデバイスに直接保存するだけで、携帯電話の内部ストレージを空けることができます。
Blackmagic CamをAiffro P10/P10 Plusで設定する方法
ここでは、Blackmagic CamアプリとAiffro SSDを使用してプロフェッショナルなビデオを撮影および保存するための簡単なステップバイステップガイドを紹介します。
ステップ1:Blackmagic Camアプリのインストール
- App Storeにアクセスし、「Blackmagic Camera」を検索します。
- アプリをダウンロードしてインストールします。
- アプリを開き、すべての許可(カメラ、マイク、ストレージ)を許可します。
ステップ2:アプリのビデオ設定を調整する
- 解像度を選択します:1080p、4K、または4K DCI
- フレームレートを設定します(シネマティックには24fps、スムーズには60fps)
- コーデックを選択します:Apple ProRes(最高品質用)
- 必要に応じてホワイトバランスを手動で設定します
- 一貫したショットのために露出と焦点をロックします
ステップ3:Aiffro P10またはP10 Plusを接続する
- USB Type-CまたはLightningケーブルを使用して、P10/P10 Plus SSDをiPhoneに接続します。
- iPhoneなどのMagSafe対応モデルの場合、SSDは携帯電話の背面に磁気で固定されます。
- Filesアプリにドライブが表示されます。
- 内部ストレージに直接ビデオを録画し、録画後すぐに映像をSSDに移動します。
- ユーザーはBlackmagic Camアプリの設定でP10/P10 Plus SSDをプライマリかつ直接の記録先として選択することもできます。
ヒント:複数回撮影しても、ストレージ制限を気にすることなく、すぐにそれぞれの撮影をオフロードできます。
iPhone + Blackmagic Camでより良い動画を撮影するためのヒント
最高のスマートフォンに最高の撮影アプリケーション、そして最も効率的なP10/P10 SSDを持っています。それでも、いくつかの実用的なヒントを適用してスマートに撮影する必要があります。
- 安定したショットのために三脚またはジンバルを使用する
- マニュアルフォーカスはあなたの味方です。オートフォーカスのハンティングは避けてください。ただし、慎重に設定を選択すれば可能です。
- ユーザーはソフトボックスまたは自然光を使用して、強い影を避けることができます
- 可能な場合は、外部マイクを使用してクリーンなオーディオを録音できます
- 録画する前に、アングル、動き、シーンを把握しておく
iPhone 15 Proに最適なBlackmagic Cameraアプリ設定(Apple Log撮影ガイド)
Aiffroはすでに、Blackmagic Cameraアプリで撮影された動画のストレージ問題と大きなファイルサイズについて議論しており、これはP10/P10 Plus SSDが解決します。Blackmagic Camアプリを使用して、優れたダイナミックレンジを持つ高品質な動画をより小さなサイズで作成するコツを明らかにするときが来ました。Blackmagic Cameraアプリは、デフォルトのカメラアプリよりも多くの制御を可能にし、より小さなファイルサイズと驚くべき品質でApple Logで撮影できます。ここでは、使用する最適な設定をステップバイステップで説明します。
ステップ1:適切なビデオコーデックを選択する
- Blackmagic Cameraアプリを開きます
- 設定(歯車アイコン)をタップします
- 「Codec」でHEVC H.265 10-bitを選択します
なぜこれが重要なのか:
この設定により、ProResに匹敵する品質を、わずか約5%のファイルサイズで得ることができます。グリーンスクリーンで撮影する場合や、非常に高い色精度が必要な場合は、ProRes 422を選択できます。
ステップ2:解像度とカラースペースを設定する
-
同じ設定メニューで:
- 解像度を4Kに設定します
- カラースペースをApple Logに設定します
なぜこれが重要なのか:
Apple Logは人工的なシャープネスを減らし、映像により広いダイナミックレンジを与え、編集やカラーグレーディングに役立ちます。
ステップ3:ホワイトバランスをロックする
- メインカメラ画面のWBアイコン(ホワイトバランス)をタップします
- ホワイトバランスを手動で設定し、ロックします(日中の場合、5500Kが良い出発点です)
なぜこれが重要なのか:
自動ホワイトバランスは撮影中に色を変える可能性があり、ロックすることで色の一貫性を保ちます。
ステップ4:ゼブラを有効にして露出を確認する
- フレーミングアイコン(右上隅)をタップします
- 次にゼブラアイコンをタップします
- ゼブラのしきい値を95%に設定します
なぜこれが重要なのか:
ゼブラは露出オーバーの領域を示します。ゼブラストライプが見える場合は、画像の一部が明るすぎるため調整が必要です。
ステップ5:露出を適切に制御する
マニュアル露出を使用する
- 画面をランダムにタップしないでください。これは自動露出を有効にし、設定を台無しにする可能性があります。
- ISOを手動で設定し、約1250にロックします
良いISO範囲:1100から1450の間。この範囲は、iPhoneが提供できる最高のダイナミックレンジ(プロ用カメラと同様に最大14ストップ)を提供します。
注意:iPhone 15 Proの低いISOはノイズを低減しますが、ダイナミックレンジも低下させます。最高のR結果を得るには、ISO 1250付近のスイートスポットを維持してください。
ステップ6:シャッタースピードをロックする
- 24fpsで撮影する場合、シャッタースピードを1/48秒に設定します(または1/50秒など、可能な限り近い値に設定します)
- シャッタースピードをロックします
なぜこれが重要なのか:
シャッタースピードをロックすると、自然な「シネマティック」なモーションブラーが得られ、また、タップしてフォーカスを合わせたときにカメラが明るさを調整するのを防ぎます。
ステップ7:自動露出の変更を避ける
シャッタースピードをロックした後、画面をタップするとAF(オートフォーカス)のみが表示され、AF/AE(オートフォーカス/自動露出)は表示されなくなることに気づくでしょう。これは、露出がランダムに変化しなくなることを意味し、これはまさにあなたが求めていることです。
ステップ8:屋外ではNDフィルターを使用する
明るい日差しの中で撮影していて、映像が明るすぎる場合(ISOとシャッターがロックされていても)、NDフィルターを使用してください。
NDフィルターとは?
カメラのサングラスのようなもので、色やシャープネスを変えることなく画像を暗くします。
オプション:
- NDフィルタークリップオンアダプター
- NDフィルターマウントが内蔵されたケース
なぜこれが重要なのか:
iPhoneのレンズ開口部は固定されており(f/1.8)、露出制御はISOとシャッタースピードのみです。NDフィルターは、モーションブラーやダイナミックレンジを犠牲にすることなく、明るい状況でも完璧な露出を保つのに役立ちます。
最後のヒント:カラーグレーディング
Apple Logで撮影すると、映像はカメラから出てきたときに平坦で灰色に見えます。これは正常です。後でカラーグレーディングすることを意図しています。
プロフェッショナルなLUT、またはDaVinci Resolve、Final Cut、Premiere Proなどの編集ソフトウェアのカラープリセットを使用して、映像に命を吹き込むことができます。
クイックテーブル
|
設定 |
推奨値 |
|
コーデック |
HEVC H.265 (10-bit) |
|
解像度 |
4K |
|
カラースペース |
Apple Log |
|
ホワイトバランス |
マニュアル (例: 5500K) |
|
ゼブラ |
有効、95%に設定 |
|
ISO |
約1250 (1100–1450の範囲) |
|
シャッタースピード (24fps) |
1/48秒 (ロック) |
|
NDフィルター |
明るい屋外光で使用 |
|
オートフォーカスのみ |
シャッターロック後にタップ |
これらの設定で、以下が得られます。
- 最大限のダイナミックレンジ
- 鮮明でプロフェッショナルな品質のビデオ
- 管理しやすいファイルサイズ
- カメラの完全なマニュアルコントロール
このガイドに従うだけで、iPhone 15 Proからシネマティックなショットをすぐに手に入れることができます。
実際の使用事例:移動中の旅行Vlogger
iPhoneとBlackmagic Camアプリを使って撮影する旅行Vloggerが、Wi-Fiやクラウドサービスのない遠隔地にいる場合、小さなクリップを撮影するだけでも携帯電話の内部ストレージがいっぱいになり、通常の動作に影響を及ぼします。ストレージ不足の表示が出ると、ビデオ撮影を続けたり、以前のファイルを削除したりしなければならなくなります。Aiffro P10/P10 Plusのような外部ストレージソリューションがあれば、一日中フル品質で撮影したり、直接SSDに動画を転送したりすることができ、ラグやワークフローの妥協なしに作業できます。
ビデオストレージにAiffroを選ぶ理由
市場には多くのSSDがありますが、AiffroはiPhoneコンテンツクリエイター向けにP10とP10 Plusを設計しました。
- MagSafeグリップ = 撮影中の揺れが少ない
- 長時間の録画でも過熱しない
- プラグアンドプレイのシンプルさ
- iPhone、Mac、PC、さらにはAndroidとも互換性がある
- 大きな機材を持ち運びたくないクリエイター向けに作られている
そして、他のSSDとは異なり、Aiffroはシンプルさを追求しています。差し込むだけで動作します。アプリもドライバーも余分な設定も必要ありません。
結論
プロのビデオコンテンツを作成するために、巨大なカメラリグや高価なシネマ機材は必要ありません。iPhoneにBlackmagic Camのような適切なアプリと、Aiffro P10/P10 Plusのような信頼性の高いストレージがあれば、扱いが難しい高価でかさばるカメラを購入する必要がなくなる強力な映画制作ツールを手に入れることができます。
コメントを書く
このサイトはhCaptchaによって保護されており、hCaptchaプライバシーポリシーおよび利用規約が適用されます。